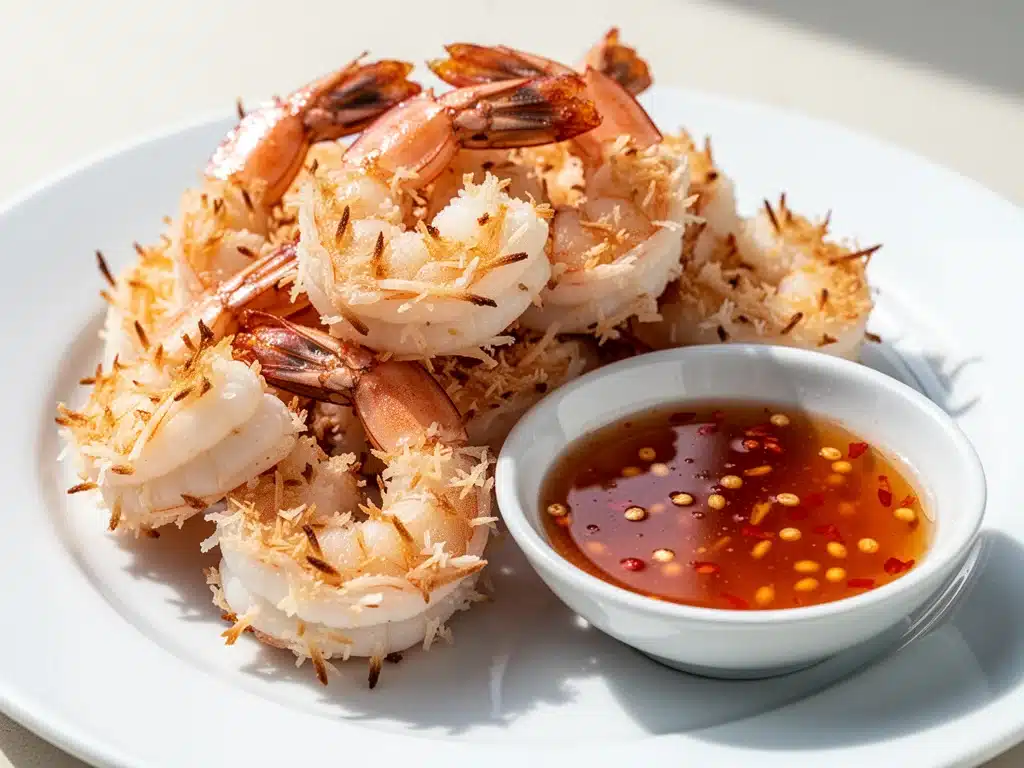
Last Friday night, I was staring into my open freezer, feeling that specific kind of Tuesday exhaustion where cooking feels like a chore rather than a joy. I had zero motivation for a full dinner, but I desperately wanted something crunchy, sweet, and salty all at once. I pulled out a bag of frozen shrimp and a can of coconut milk, half-expecting a disaster. I didn’t have panko, so I crushed up some saltines. I didn’t have fancy dipping sauces, so I grabbed the sweet chili sauce from my pantry that I usually ignore.
Twenty minutes later, my kitchen smelled like a Thai restaurant. My partner walked in, sniffed the air, and asked if we were ordering takeout. When I told him we were eating homemade coconut shrimp, he didn’t believe me until he took a bite. That was the moment I realized that the best appetizers aren’t the ones with ten complex steps—they’re the ones that hit all the right flavor notes with minimal effort.
Since then, I’ve made this coconut shrimp recipe at least a dozen times. It’s become my go-to when friends drop by unexpectedly, when I need to impress someone without spending hours in the kitchen, or simply when I need a little treat for myself. The key isn’t just in the ingredients; it’s in the technique. I’ve tested this method dozens of times to ensure the coating stays crisp, the shrimp stays juicy, and the dipping sauce actually tastes like something from a high-end appetizer plate.
This isn’t just another fried shrimp recipe. It’s the one that finally convinced me that homemade is worth the five minutes of extra work. If you’ve ever been intimidated by frying at home, or if you’ve tried making this before and ended up with soggy, flabby shrimp, this guide is for you. I’m sharing exactly how I nail the crunch every single time.
Why You’ll Love This Crispy Appetizer
There are about a hundred reasons I keep coming back to this coconut shrimp recipe, but they all boil down to one thing: it delivers restaurant-quality results without the restaurant price tag or the wait. Here’s why this is the only coconut shrimp recipe you’ll ever need.
- Stupidly Simple Technique — Seriously, if you can crush crackers and dip shrimp, you can make this. I’ve walked my teenage nephew through it over FaceTime while he was stuck at home alone. No complex knife skills, no fancy equipment.
- Lightning Fast Prep — 20 minutes from start to finish. I know, I know, it feels too good to be true. But with pre-peeled shrimp and a simple breading station, the actual hands-on time is less than 15 minutes. Perfect for those “I need dinner in an hour” moments.
- The Crunch Factor — Most homemade versions fall flat because they get soggy. I use a specific mix of crushed saltines and panko (when I have it) to create a shatteringly crisp coating that stays crunchy even after you dip it. It’s the difference between “okay” and “addictive.”
- Pantry-Friendly Ingredients — You probably have 90% of this already. Coconut flakes, sweet chili sauce, eggs, flour, and shrimp. If you don’t have panko, I’ll show you what to use instead. This is a recipe that works with what you have.
- Crowd-Pleaser Status — I’ve served this to my vegan friend (with a tofu swap, though it’s not the same), my gluten-sensitive brother, and my picky six-year-old. Everyone loves it. It’s the universal appetizer that brings people together.
- Budget-Smart — Feeds 4-6 people as an appetizer for under $20. That’s significantly less than what you’d pay for a plate at a sushi bar or Thai restaurant, and it tastes fresher, too.
This is my go-to when I need to impress without stressing. No complicated techniques, no weird ingredients you have to order online, just reliable, delicious food that makes everyone happy.
Ingredients You’ll Need
Here’s the best part: you probably have most of this already in your pantry and freezer. I’m particular about three ingredients here, and I’ll tell you exactly why they matter. For the rest, I’m flexible.
For the Shrimp
Jumbo or Extra-Large Shrimp (1.5 pounds / 680g, peeled and deveined) — Size matters here. You want large enough to be satisfying but small enough to eat in two bites. I prefer wild-caught shrimp if I can find them, but frozen works perfectly fine. Just make sure to thaw them completely and pat them dry. Wet shrimp = soggy breading. I learned this the hard way.
Buttermilk (1 cup / 240ml) — This is my secret weapon. Buttermilk tenderizes the shrimp and helps the breading stick better than plain milk. If you don’t have buttermilk, mix 1 cup of milk with 1 tablespoon of lemon juice or vinegar and let it sit for 5 minutes. It’s not the same, but it works.
Eggs (2 large) — Just standard large eggs. Whisk them well before dipping. I use the buttermilk marinade first, then the egg wash, then the crumbs. This three-step process is crucial for that extra-crispy coating.
All-Purpose Flour (1 cup / 120g) — For the initial dredge. This creates a dry base for the wet ingredients to stick to. Don’t skip this step. It’s the glue between the shrimp and the egg.
Panko Breadcrumbs (1.5 cups / 150g) — I love panko for its airy, crunchy texture. If you can’t find it, use regular breadcrumbs, but they’ll be denser. Or, as I did my first time, use crushed saltines or even cornflakes. It still works, just different.
Shredded Coconut (1 cup / 90g, unsweetened) — Use unsweetened coconut flakes. If you use sweetened, your shrimp will be too sugary when paired with the sweet chili sauce. I buy the bagged shredded coconut from the baking aisle—it’s cheaper than the fancy toasted stuff and works just as well.
Salt and Black Pepper — To taste. I season the flour and the coconut mixture separately.
For the Sweet Chili Dipping Sauce
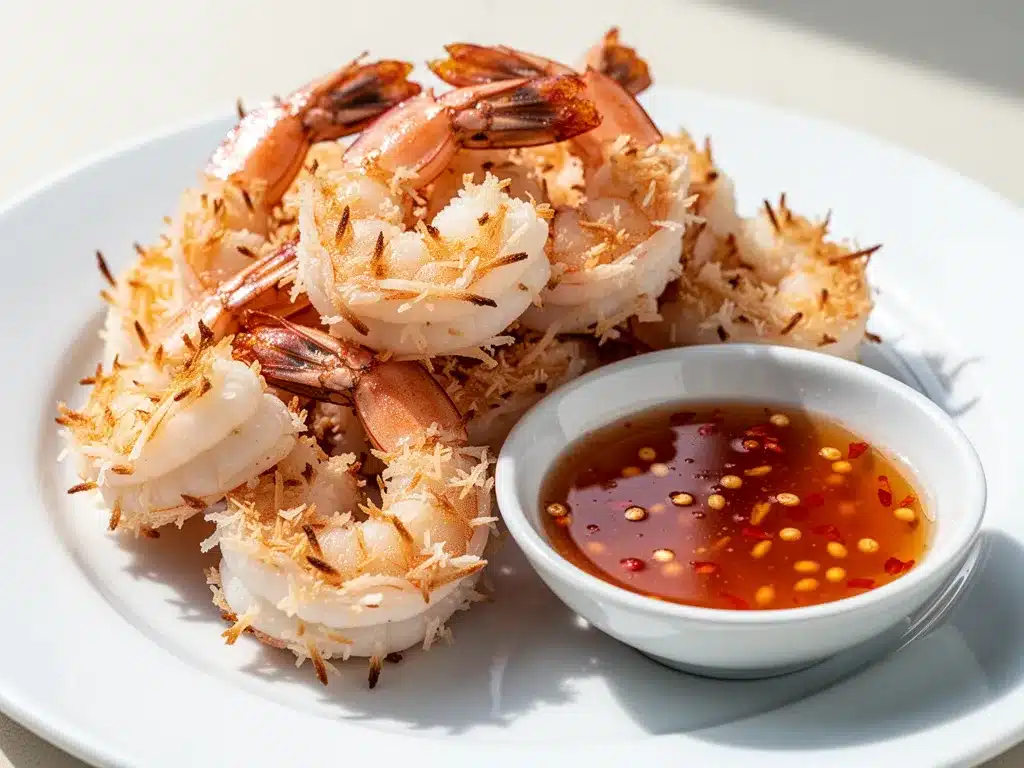
Sweet Chili Sauce (½ cup / 120ml) — The bottle stuff from the Asian aisle is actually perfect here. Brands like Mae Ploy or Huy Fong work great. Don’t overthink this.
Soy Sauce (1 tablespoon) — Adds saltiness and umami to balance the sweetness. Low-sodium is fine.
Lime Juice (1 tablespoon, fresh) — Brightens everything up. Bottled lime juice tastes bitter and metallic. Please, for the love of all that is holy, use fresh lime.
Minced Garlic (1 clove) — Or ½ teaspoon jarred garlic if you’re being lazy. Fresh is better, but jarred works in a pinch.
Red Pepper Flakes (¼ teaspoon, optional) — For a little kick. I always add this. If you don’t like spice, skip it.
Water (1-2 tablespoons) — To thin the sauce to the perfect dipping consistency.
For Frying
Vegetable or Canola Oil (about 2 cups / 480ml) — You need enough oil to come halfway up the shrimp in your skillet. Vegetable oil has a high smoke point, which is exactly what you need for frying. Don’t use olive oil—it burns too easily.
Equipment Needed
You don’t need fancy equipment for this. Here’s what I actually use.
Large Skillet or Dutch Oven — I use a 12-inch cast iron skillet. It holds heat well and gives you plenty of room to fry shrimp in batches without crowding. A Dutch oven works too if you’re frying larger batches.
Three Shallow Bowls — You need three dishes for your breading station: one for flour, one for the egg wash, and one for the coconut mixture. I use pie plates or shallow casserole dishes. Wide is better than deep.
Cutting Board and Knife — For prepping the garlic and limes. Standard stuff.
Candy or Deep-Fry Thermometer — Highly recommended. You want your oil at 350°F (175°C). If you don’t have a thermometer, stick the end of a wooden chopstick in the oil—if bubbles form around it steadily, it’s ready. I tested this method once and fried them at too low a temp. The breading absorbed the oil and got greasy. Don’t make my mistake.
Wire Rack and Baking Sheet — To drain the fried shrimp. Paper towels work too, but a rack keeps the bottoms crispy. Paper towels trap steam, which can make the bottoms soggy. I prefer the rack.
Slotted Spoon or Tongs — For flipping and removing shrimp from the oil. Tongs give you better control.
Blender or Food Processor — Only if you’re crushing crackers instead of using panko. Otherwise, a ziplock bag and a rolling pin works fine.
How to Make It: Step-by-Step
Alright, let’s make this! I’m walking you through exactly how I do it, including the little tricks I’ve picked up.
Step 1: Prep Your Shrimp (10 minutes)
If you bought frozen shrimp, thaw them in cold water for 20 minutes. Drain well and pat them completely dry with paper towels. This is non-negotiable. Wet shrimp will not hold their breading. Remove the veins if they’re still there, and trim any long antennae so they don’t burn in the oil.
Place the dried shrimp in a bowl with the buttermilk. Toss to coat, cover, and let them marinate in the fridge for at least 15 minutes (or up to 2 hours). This tenderizes the shrimp and adds flavor.
Step 2: Set Up Your Breading Station (5 minutes)
While the shrimp marinate, set up three shallow bowls. In the first bowl, mix the flour with 1 teaspoon of salt and ½ teaspoon of black pepper. In the second bowl, whisk the eggs with a pinch of salt. In the third bowl, mix the panko, shredded coconut, 1 teaspoon of salt, and ½ teaspoon of black pepper. Toss the coconut and panko together so they’re evenly distributed.
Step 3: Bread the Shrimp (5-8 minutes)
Remove the shrimp from the buttermilk, letting excess drip off. Dredge each shrimp in the flour mixture, shaking off any excess. Dip it into the egg wash, letting the excess drip off again. Finally, press it firmly into the coconut-panko mixture, making sure it’s fully coated. Place the breaded shrimp on a clean plate or baking sheet. Repeat with all the shrimp. I usually do this in batches so I don’t get overwhelmed.
Step 4: Heat the Oil (5-10 minutes)
Pour about 1 inch of vegetable oil into your skillet or Dutch oven. Heat over medium-high heat until it reaches 350°F (175°C). If you don’t have a thermometer, test it with a wooden chopstick as mentioned earlier. The oil should be hot but not smoking.
Step 5: Fry the Shrimp (4-6 minutes per batch)
Carefully place 4-5 shrimp into the hot oil, making sure not to crowd the pan. Crowding lowers the oil temperature and leads to greasy shrimp. Fry for 2-3 minutes on the first side, until golden brown and crispy. Flip and fry for another 1-2 minutes on the other side. The shrimp should be pink and opaque, and the coating should be deep golden.
Remove the shrimp with tongs or a slotted spoon and place them on the wire rack to drain. Repeat with the remaining batches, letting the oil heat back up to 350°F between batches.
Step 6: Make the Dipping Sauce (5 minutes)
While the shrimp are frying, whisk together the sweet chili sauce, soy sauce, lime juice, minced garlic, and red pepper flakes in a small bowl. Add water one tablespoon at a time until you reach your desired consistency. Taste and adjust. Need more sweet? Add more chili sauce. Need more tang? Add more lime. This is your sauce, so make it yours.
Step 7: Serve
Serve the coconut shrimp immediately while they’re hot and crispy. Arrange them on a platter with the dipping sauce on the side. Garnish with fresh cilantro or lime wedges if you want to look fancy. I usually just dig in.
Total Time: About 30 minutes (15 minutes active, 15 minutes mostly hands-off)
Expert Tips & Tricks
Here’s everything I’ve learned from making this dozens of times. These tips will save you from my mistakes.
Keep the Oil Hot
This is the #1 tip. If the oil drops below 325°F, your shrimp will absorb oil and get greasy. If it goes above 375°F, the coating will burn before the shrimp cooks. Use a thermometer. It’s worth the investment. I keep mine clipped to the side of the pan so I can monitor it constantly.
Don’t Crowd the Pan
Frying in batches might seem annoying, but it’s essential. When you overcrowd the pan, the oil temperature plummets, and you end up with soggy, oily shrimp. I usually fry 4-5 shrimp at a time. It takes longer, but the result is worth it.
Pat Dry, Always
I can’t stress this enough. Wet shrimp = bad breading. After thawing, pat them dry. After dredging in flour, shake off the excess. After dipping in egg, let the excess drip. Every step matters.
Toast the Coconut (Optional)
If you want extra flavor, toast the shredded coconut in a dry skillet for 2-3 minutes before mixing it with the panko. Watch it closely—it burns fast. Toasted coconut adds a nutty depth that’s amazing.
Common Mistakes (and how to avoid them):
Mistake: Coating falls off
Fix: You didn’t press the shrimp firmly enough into the coconut mixture. Or your oil wasn’t hot enough. Make sure the coating adheres well before dropping it in the oil.
Mistake: Shrimp is undercooked
Fix: Fry for the full 4-5 minutes. Shrimp cook fast, but large jumbo shrimp need a bit more time. They should be opaque and pink, not translucent.
Mistake: Sauce is too thick
Fix: Add water one tablespoon at a time. It’s easier to thin it than to thicken it.
Pro Tricks I’ve Learned:
For Extra Crunch
Double-dip the shrimp. Dip in flour, egg, coconut, then back in egg, then back in coconut. This creates a thicker, crunchier coating. I do this when I’m feeling extra indulgent.
For Best Flavor
Add a pinch of sugar to the coconut mixture. It enhances the coconut flavor and caramelizes slightly in the oil. Just ½ teaspoon per cup of coconut.
Make-Ahead Strategy
You can bread the shrimp up to 4 hours ahead and store them on a baking sheet in the fridge. Just don’t fry them until you’re ready to serve. This is great for parties.
Variations & Substitutions
Once you’ve nailed the basic version, here’s how you can mix it up. I’ve tried all of these.
Baked Version
For a lighter option, preheat oven to 400°F (200°C). Place breaded shrimp on a wire rack over a baking sheet. Spray lightly with cooking oil. Bake for 12-15 minutes, flipping halfway through. They won’t be as crispy as fried, but they’re still good and much healthier.
Spicy Kick
Add 1 teaspoon of cayenne pepper to the coconut mixture. Or mix Sriracha into the dipping sauce. For the brave, add chopped jalapeños to the breading.
Gluten-Free
Use gluten-free panko or crushed rice cereal instead of regular panko. Use gluten-free flour for the dredge. Everything else is naturally gluten-free.
Dairy-Free
Replace buttermilk with coconut milk or almond milk mixed with lemon juice. The rest is naturally dairy-free.
Vegetarian Option
Use firm tofu cubes instead of shrimp. Press the tofu, cut into cubes, and follow the same breading and frying process. It’s not the same, but it’s a decent alternative.
Different Sauces
Try a peanut dipping sauce (peanut butter, soy sauce, lime, garlic, water). Or a simple mayo-based aioli with garlic and lemon. Both are delicious.
Serving & Storage
How to Serve:
I usually serve this straight from the wire rack on a large platter. It looks rustic and stays warm. But here are other ways I’ve enjoyed it:
Side Dishes:
- Steamed jasmine rice
- Simple green salad with sesame dressing
- Edamame with sea salt
- Coleslaw (the crunch matches perfectly)
Toppings Bar:
When I have guests, I put out: extra sweet chili sauce, sriracha, fresh cilantro, lime wedges, crushed peanuts. Everyone customizes their plate.
Storage Instructions:
Refrigerator:
Store leftover shrimp in an airtight container for up to 2 days. The coating will lose some crunch, but they’re still good.
Reheating:
Best method: Reheat in an air fryer at 375°F (190°C) for 3-4 minutes. This restores the crispiness. Oven method: Bake at 400°F for 5-7 minutes. Microwave method: Avoid this. It makes the coating soggy and rubbery. I’ve tried it. It’s not pretty.
Freezing:
You can freeze the breaded, uncooked shrimp. Place them on a baking sheet in the freezer until solid, then transfer to a freezer bag. They’ll keep for up to 2 months. Fry from frozen, adding 1-2 minutes to the cook time. This is great for meal prep.
Pro tip:
Make the dipping sauce ahead of time. It actually tastes better after sitting in the fridge for an hour, as the flavors meld together.
Nutrition Information
I’m not a nutritionist, but here’s the breakdown if you’re tracking. This is per serving (based on 4 servings as an appetizer).
| Nutrient | Amount |
|---|---|
| Calories | 380 |
| Protein | 22g |
| Carbs | 35g |
| Fiber | 2g |
| Sugar | 12g |
| Fat | 18g |
| Saturated Fat | 12g |
| Cholesterol | 180mg |
| Sodium | 650mg |
What’s Good:
- High protein from the shrimp
- Relatively low carb if you skip the breading (baked version)
- Good source of selenium and B12
What to Know:
- Higher in calories from frying and coconut
- Contains shellfish (shrimp)
- Moderate sodium (use low-sodium soy sauce to reduce)
My Take:
Look, this is an indulgent appetizer. It’s fried, it’s coconut, it’s sweet and salty. It’s not a diet recipe. But it’s way better than takeout, costs less, and I know exactly what’s in it. When I want to make it lighter, I bake it and use less oil. But usually? I just eat a reasonable portion and enjoy it.
Final Thoughts
So that’s my go-to coconut shrimp recipe! I’ve probably talked your ear off at this point, but when you make a recipe this often, you have a lot to say about it.
This has saved dinner parties more times than I can count. It’s my answer to “what can I bring to the potluck?” when I want to stand out. My friends are always asking for the recipe, and I love that I can make something that feels fancy but is actually super simple.
Make it yours! Try different dipping sauces, swap in your favorite spices, adjust the sweetness. The best recipes are the ones you adapt to your family’s tastes.
If you make this, drop a comment and let me know what you think! I love hearing how recipes turn out in your kitchen. And if something doesn’t work, tell me that too—I’m here to help troubleshoot.
Happy cooking! And I hope your kitchen smells half as good as mine does right now.
Frequently Asked Questions
Can I use frozen shrimp?
Absolutely. In fact, frozen shrimp is often fresher than “fresh” shrimp that’s been sitting in a case. Just make sure to thaw them completely in cold water, then pat them very dry. Any moisture will prevent the breading from sticking.
Why did my coating fall off in the oil?
This usually happens for two reasons: either the shrimp were too wet before breading, or the oil wasn’t hot enough. Make sure to pat the shrimp dry, shake off excess flour, and press the coconut mixture firmly onto the shrimp. Also, check your oil temperature—it should be 350°F.
Can I bake this instead of frying?
Yes! Preheat your oven to 400°F (200°C). Place the breaded shrimp on a wire rack over a baking sheet. Lightly spray them with cooking oil. Bake for 12-15 minutes, flipping halfway through. They won’t be as crispy as fried, but they’re healthier and still delicious.
Can I make the dipping sauce ahead of time?
Yes, and you should! The flavors meld together after sitting in the fridge for an hour. Store the sauce in an airtight container for up to 5 days. Give it a stir before serving.
What size shrimp should I use?
I recommend jumbo or extra-large shrimp (21-25 count per pound). They’re large enough to be satisfying but small enough to eat in two bites. Avoid small shrimp—they’re too delicate for this breading method.
Can I double this recipe?
Yes, but you’ll need to fry in more batches to avoid overcrowding the pan. Keep the cooked shrimp warm in a 200°F oven while you finish frying the rest. Don’t stack them—keep them on a wire rack so they stay crispy.
Is there a substitute for coconut?
If you’re allergic to coconut, you can omit it and just use panko. It won’t be “coconut shrimp,” but it will still be crispy and delicious. You can also add crushed cornflakes or rice cereal for extra crunch.
Pin This Recipe!
Coconut Shrimp: 5-Step Crispy Appetizer
- Total Time: 30 minutes
- Yield: 4 servings 1x
Description
A simple, crispy homemade coconut shrimp recipe that delivers restaurant-quality results in just 20 minutes. Featuring a three-step breading process for maximum crunch and a sweet chili dipping sauce.
Ingredients
- 1.5 pounds jumbo or extra-large shrimp, peeled and deveined
- 1 cup buttermilk
- 2 large eggs
- 1 cup all-purpose flour
- 1.5 cups panko breadcrumbs
- 1 cup unsweetened shredded coconut
- Salt and black pepper to taste
- 1/2 cup sweet chili sauce
- 1 tablespoon soy sauce
- 1 tablespoon fresh lime juice
- 1 clove minced garlic
- 1/4 teaspoon red pepper flakes (optional)
- 1–2 tablespoons water
- 2 cups vegetable or canola oil for frying
Instructions
- Thaw frozen shrimp if necessary, then pat them completely dry with paper towels. Place shrimp in buttermilk, cover, and marinate in the fridge for at least 15 minutes.
- Set up a breading station with three shallow bowls. Mix flour with 1 tsp salt and 1/2 tsp pepper in the first bowl. Whisk eggs with a pinch of salt in the second bowl. Mix panko, shredded coconut, 1 tsp salt, and 1/2 tsp pepper in the third bowl.
- Remove shrimp from buttermilk, letting excess drip off. Dredge in flour, dip in egg wash, then press firmly into the coconut-panko mixture to coat fully.
- Heat vegetable oil in a large skillet or Dutch oven to 350°F (175°C).
- Fry shrimp in batches (4-5 at a time) for 2-3 minutes per side until golden brown and opaque. Do not crowd the pan.
- Remove shrimp to a wire rack to drain. Repeat with remaining batches.
- Whisk together sweet chili sauce, soy sauce, lime juice, garlic, and red pepper flakes. Add water to thin to desired consistency.
- Serve immediately with the dipping sauce.
Notes
Ensure shrimp are completely dry before breading to prevent soggy coating. Keep oil temperature between 325°F and 375°F. For extra crunch, double-dip the shrimp in egg and coconut mixture. Can be baked at 400°F for 12-15 minutes for a lighter option.
- Prep Time: 15 minutes
- Cook Time: 15 minutes
- Category: Appetizer
- Cuisine: Asian
Nutrition
- Serving Size: Approximately 4-6 sh
- Calories: 380
- Sugar: 12
- Sodium: 650
- Fat: 18
- Saturated Fat: 12
- Carbohydrates: 35
- Fiber: 2
- Protein: 22
Keywords: coconut shrimp, crispy shrimp, appetizer, fried shrimp, sweet chili sauce, easy recipe, seafood